Thursday, August 6, 2015

Feel Better Soon

Hello!  If you are reading this I thank you for sticking around.

Papercrafting time was put on the back burner for months while in the process of downsizing and looking forward to retirement.  The retirement in itself will bring major changes, but that's another post. I am hoping the downsizing will be appreciated by my sons; probably not as they have no idea the amount of stuff that has left this house!  Well, in any case, I have done (am doing) my part!

A couple of events happened that needed cards (sad events) and a couple of birthdays, so I pushed aside the awful mess in the Sun Room Studio and got to it.  Here's the card for a long time friend who has been having health issues. 
You can click the photo to enlarge

Inside it says "Feel Better Soon".  Praying for complete recovery for this sweet guy.

Hope you are having a wonderful summer.  Thanks for sticking around!  Hugs, Shawna 

Supplies: Spellbinders, embossing folder, Silhouette, Computer generated sentiment, and Melanie Muenchinger Year of Flowers sentiment (inside)  

Wednesday, April 1, 2015

Easter Scrapbook Page

Hi all! Another Silhouette Sunday and today I have a scrapbook page It's a flashback from the former Paper Kisses and inky Wishes blog, but I can never get enough of remembering the grandkids when they were little.  This is Zachary and his daddy dying Easter eggs.  so cute!
I just love the picture of my oldest son with my youngest grandson. Zachary was very excited to be coloring eggs with daddy!
Even though this is an Easter page and I always think pastels for Easter, I didn't want the page to appear girly so I went with a palette of browns with a little bling and one pop of color. I think it was successful.
The mat with the gold fleur de lis pattern and the turquoise circle were so easy to size and cut with the Cameo. I am loving the 12" platform!!! The journaling box is simply a smaller cut of the mat file and I used the sketch pen option to add the information on the paper before cutting it out. To sketch you simply replace the blade with a sketch pen, choose your font and wording and away you go. Easy peasy!

Thank you so much for taking time out of your weekend to visit More Paper Kisses and Inky Wishes. It means a lot to me. Hugs, Shawna

Monday, February 16, 2015

Three Little Kittens

Today I have a card that I made quite awhile ago and never posted.  Isn't this image sweet? It's called Three Little Kittens and Lynne Stansbery -- Squigglefly digital stamps -- is the artist. I love her work!
I am keeping it short and sweet today.  Hope your week is going well. Hugs, Shawna
Supplies: White core card stock, mulberry paper roses by Recollections, Spellbinders, Copics, Squigglefly

Monday, December 22, 2014

MERRY CHRISTMAS!

Every year I try to make my Christmas cards and I never seem to have enough time and the process becomes stressful and a chore rather than a labor of love. Soooooo, last year I sent out store bought cards and saved the ones I made last year to send out THIS year. Currently I am working on NEXT year's card. I know that seems a bit odd, but it sure takes the pressure off. If I don't get the cards done it's no big deal because I can work on them after Christmas, even into the new year. Stress kills, ladies!!! Let's plan on living a long time :-)


This photo was oriented the correct way in photo program. I do not know why it sometimes does this sideways act upon transferring to blogger, but it does. Sorry about that. I've said it before, I don't know how to correct this. Would be nice if they had a way to rotate the photo after it's been downloaded.
Used for this card: Snowflake Cuttlebug folder, Spellbinder's Oval nestie, Copic markers to color the lamppost stamp, Cranberry Stampin' Up ink for stamping Christmas Hugs.
BIG CHRISTMAS HUGS TO ALL OF YOU! Shawna

*Note*  This is an old post from the former Paper Kisses blog. 

Monday, December 15, 2014

'Tis the Season

Good morning~  No, I haven't forgotten to post, it has just been crazy around here and I have had aand and dealing with a few health issues, so many things have had to be put on the back burner.  But it will all sort out I am sure.
This is a previous post from the old Paper Kisses blog, but truly I have not had time nor the energy to sit down and actually do any scrapbooking and when I realized I hadn't posted for TWO MONTHS, I though I should at least save a post or two from the old blog and let you know I am still alive and kicking.
This is my middle grandchild's pages
for his album. Obviously it is Christmas morning. My favorite pic is the one with my youngest son with his arm around Fletcher. Those two are something else. Jerry is such a good daddy! There are no mats on this layout. I let the tree-patterned paper be the only background and I didn't think mats were needed; I rather like the look of everyone being wrapped in fir needles! 
Thanks for stopping by today, hope your week is a good one.  Hugs, Shawna

Sunday, October 19, 2014

Another Fall Project

Please Note:  This is an old post from the former Paper Kisses and Inky Wishes Blog. 

 I have been working feverishly (wipng my hand across my brow...) in Paint Shop Pro trying to get a decent picture of my project. It's glass and I find glass so hard to photograph. But here goes....
OK --- look's like it worked fairly well :-)
 I found this adorable apple plate at the local second hand store and thought it would be perfect for a little fall etching project. Cutting stencils is easy peasy with the Silhouette. The only real 'trick' is to make sure you leave enough of a border so the etching cream doesn't get on any part of the glass that you do not want etched. The leaf in the upper left corner was an after thought because I wasn't paying enough attention, and a bit of the cream got up there where I didn't want it. Not really a problem because I just cut another stencil and etched that part, but if you are working on something that wouldn't lend itself to any additions, then you must be careful.
I am making a note to myself to check back with the thrift store tomorrow and get the other three plates they had. I hope you have a fabulous week and I thank you for stopping by.
Hugs, Shawna

Sunday, October 12, 2014

The Other Card

Good Sunday morning to you!  Thank you for stopping by today; I love it when you do. 

Today I wanted to show you the other cards I made with Lynne Stansbery's "Sunflowers Gone Wild" digital image.  As I said before, I love her realistic images.  You can check out more of her fabulous images at Squigglefly.  I colored up the four extra images I printed from last week's card project and had enough of the paper from DCWV's Lemon Flower Stack to make another card and a couple of tags.  I think I will try making a tag each time I work on a card so I have some on hand.  It doesn't take a whole lot of time or effort to make one up while all the supplies are right there on the table, and there is always cardstock and DP leftover.  And my remnants of paper drawer is chock full.  This sounds like a plan!!! 


Sunday, October 5, 2014

A Salute to Autumn

Fall is officially here and I could not resist pulling out my favorite fall digi stamp from Squigglefly called "Sunflowers Gone Wild" by the very talented Lynne Stansbery.  I adore her realistic images.  Her sketches have all the shading practically done for you so it makes them very quick and easy to color.  I love to color, it is so relaxing for me, but even those who don't enjoy it, would like Lynne's images I am sure of it. 
While I had the digital image open I sized it for the card I had in mind, but thought why not fill the page with this fabulous image and have extras on hand.  So I duplicated my chosen size times four and then enlarged one just to have something a bit bigger to work with if the mood struck.
Today's card was pulled together with paper from the Lemon Flower Stack by DCWV, Copic markers for the coloring, and Melanie Muenchinger's sentiment from her Year of Flowers rubber stamp set.  Thank you for stopping by today.  Hugs and Happy Fall!  Shawna


Monday, September 29, 2014

It's Z Kid's Birthday

Hi all!  Are you lovin' the cooler weather or wishing for a return to summer?  We may all get our wish as once this stormy session passes we are supposed to return to warmer temps --- maybe almost 90 degress!  Wow.  Weather anymore is just too weird. 

Today I wanted to show you the birthday card I made for my grandson's 10th birthday.  He is such a sweet guy and loves his flag football, so I went with a football theme.  Sort of.


I thought it might be fun to add some hinges to this card to give a bit more interest, and I also ran the football die cut through my Grand Calibur using Fiskar's "leather" embossing plate to give some texture there as well. I used Liquid Pearls by Ranger to simulate the nail heads on the hinges and inked the edges of the balloons and the hinges with Color Box Cat's Eye inks. Adding just a bit of glitter (too much and my boy would protest!) to the sentiment with dark blue Stickles and stardust Stickles for the highlight on the balloons gave the card a bit of sparkle. You cannot see it in the photo, but some Liquid Glass by CTMH was used on the balloons to give them a shiny look.  When he opened the card at a local pizzeria one of the guests said "It's a Z card!" I knew it was a hit. 
 
Thanks for stopping by More Paper Kisses and Inky Wishes. Have a great week.  Hugs, Shawna
 
Silhouette Files:  Letter Z card base, football and helmet file, Happy Birthday Balloons, Hinge set
Paper:  Retro stack and bits and pieces from my leftover paper drawer :)  


Monday, September 22, 2014

Happy Fall!

Previously posted on the old Paper Kisses and Inky Wishes Blog.

Today I want to show you my first attempt at cutting a stencil with the Silhouette to use with fabric paints. There are products out there you can buy for this purpose but I got a fabulous tip from Kelly over on the Silhouette Plus forum about using ordinary freezer paper to cut the patterns. You select your design, load the freezer paper into the machine using the cutting mat and cut away! Next, place your cut template onto your chosen article and using a medium hot iron, fuse it (shiny down!!) to your shirt or whatever you are using. Fusing sounds permanent but I assure you it is not. It does, however, have enough of a bond to prevent the fabric paint from working its way under the stencil as you use your sponge or brush to apply the color. I did have a couple of spots lift but that was operator error because I moved the sweatshirt I was working on one too many times before I got down to business with the paints. Please keep in mind this is my first fabric paint project and while there are a couple of things I would do differently if I could do it over, all in all I am happy with the results.
I love that little tree. Hope you do, too, because it will be making another appearance in the next installment of Silhouette Sunday. Thanks so much for stopping by. Hugs, Shawna

Sunday, September 7, 2014

60 Years!

That's how long my sister Edie and her husband, Linas, have been married!!!  Wow!  Let's go for 15 more and make it 75 :)  

My nieces gave them a very nice "open house" type party with a lovely BBQ in their back yard on Saturday.  Wonderful to see so many family and friends, and I am thankful their backyard is nice and shaded as it was hotter than blue blazes. 

  
Do you enter your creations in any of the challenges that are going on?   This card will be entered into The Cutting Edge Challenge that is running now until  September 11th.  Jackie gives two weeks to enter.  That makes it so nice for those who are beyond busy, and that would include almost every one of us!!! Of course one week is all but gone, but you still have time to play. Check out her blog and the wonderful inspiration her design team has created. You can find it here:  http://thecuttingedgechallenge.blogspot.com/ 
And here's the inspiration design for this challenge.  Interpret and create accordingly.
 

Thank you so much for stopping by today.  Have a great week!  Hugs, Shawna

 
Supplies:
DCWV paper and cardstock from the Lemon Flower, Luxury, and Autumn Melody Stacks
Cut Files and Dies:  Silhouette Cut Files Bride and Groom Shilhouette, 12 x 12 background resized, 
and double rings designed by me.  Rolled rose cut file by Penny Duncan ,Spellbinders Snowflake Frame Frameability
Tools:  Silhouette Cameo, Martha Stewart & EK leaf punches, Martha Stewart scoring board
Adhesives:  Xyron Mega tape runner, Tombo liquid glue   

Friday, August 29, 2014

Happy Birthday Sweet 16

My granddaughter's 16th birthday has come and gone.  Where has the TIME gone? It marches on whether we like it or not.
I am so proud of this girl!  She is turning into such a wonderful, sweet, caring, and beautiful young woman full of common-sense and making great choices.  Her grades are great, she is involved in sports and the associated student body; just becoming a wonderful young lady.  Love you to pieces Emma girl --- as much as all the sand on all the beaches in all the world. 

A special birthday for a special girl called for a special card.  I put together a step card in some autumn-feeling colors to honor her special occasion.  And since the rolled roses precluded a regular envelope, a special box was also needed.  :)  AND there was something very special in this box along with the card, but I am not telling.  Let's just say she was extremely happy and surprised!  ;-)

 This is the top of the box.  I used two sheets of 8.5 x 11 cream paper, one for the top of the box and one for the bottom (not shown), using a Silhouette cut file.


Unfortunately, the edge of the creamsicle-colored layer is not showing the gold edge I added for additional dimension.  My personal message to her is written on the back of the card.
 
Supplies Used:  Paper is from the DCWV paper stack Coral Couture.  Spellbinders die, Viva Pen in cream, Silhouette cut files, rolled rose cut file from Penny Duncan, and a Martha Stewart leaf punch.  The sentiment was printed from the computer then die cut. 

Thank you so much for stopping by More Paper Kisses and Inky Wishes today.  Hope you are having a wonderful Labor Day Weekend.  The end of summer......:(    Hugs, Shawna

Saturday, August 9, 2014

Anniversary Card: Red, White, and Blue

Hello my bloggy friends!  2014 has continued to be a challenge.....our little town of Burney has made national news once again, this time for fires (winter-before-last it was snow).  We have three fires burning and several towns within the Burney Basin Area were evacuated.  Burney was on standby, but fortunately for the tremendous efforts of the outstanding fire personnel, equipment, and a bit of help from mother nature we were spared that event.  Two are almost contained, and the scariest one, the Eiler Fire is at 45% containment as I write this.  Weather is supposed to heat up and dry out and although everyone is breathing a sigh of relief, it isn't over yet. I think all will be fine, but please keep us in your prayers.  Anything could happen this time of the year given our historic drought here in California.

This is the monster that was threatening our little town.  The Eiler Fire.

This card is one I have been wanting to post for several weeks now but life, as usual, got in the way.  I haven't done a tremendous amount of paper crafting this summer, but have lots of projects in mind! 


This card and box were crafted for a special couple celebrating their 45th wedding anniversary.

Supplies:  DCWV paper from the Tradewinds stack, Spellbinders die, rose cut files from Penny Duncan which were cut with the Cameo and then hand rolled and shaped, Silhouette box cut file.

 I just noticed a cute black nose in the upper left corner of the last photo.  That's Burger.  Tired of waiting for a romp outside and just wanting all the paper business to be over.  :)
Thanks for stopping by!  Enjoy your weekend.  Hugs, Shawna

Sunday, July 27, 2014

Birthday Past for Miss Emma

Previously posted on the former Paper Kisses and Inky Wishes blog.

Welcome to another edition of Silhouette Sunday. I hope you have enjoyed your summer because it is rapidly coming to a close. I hate to see it go, but on the other hand, well, things may slow down a bit and I am sure most of you could use some slower paced days. I sure can!!! Besides, we need to recoup before the winter holidays start, right?
As you can tell, I am not unhappy to see the backside of August. This has been one crazy busy month. Five people near and dear to me had surgeries, and three family members had birthdays ---- all on the same day, my oldest son moved and my granddaughter started high school. She went from a class of 11 to a class of 200 not knowing a single soul, but she handled it with grace and courage. One of my jobs has been off-the-charts busy, and the garden is producing....... you get the picture. I am ready for some R & R.
Today I wanted to share with you a card I made for the above-mentioned granddaughter whose birthday was one of the three this month. I picked a chunky font, enlarged it to card size, duplicated it, flipped it, and then welded it. Presto-chango, an alphabet card. Easy peasy with the Cameo! If you have a Silhouette Cameo, SD, or Craft Robo and need any kind of assistance please come join the Silhouette Plus forum HERE. Tons of information and a wealth of generous, friendly people to help out. We also have card challenges, 3d challenges, and a scrapbook challenge. Come join the fun!


I made this box from a cut file by Lori Whitlock (3d bookplate box) that I purchased from the Silhouette Store to put Emma's card in. I wanted something she could use for other things later on so I chose this bright, happy cardstock and purposely made it different from the card. Lori made the little tab holder on the front so the label actually comes out which I thought was so neat. I reinforced the box from the inside with a few pieces of chip board covered with white cardstock and this cutie is actually quite sturdy.
Thanks for stopping by today! Enjoy your holiday weekend. Hugs, Shawna

Wednesday, July 16, 2014

Wedding Bells

are ringing for a sweet couple at my church and I wanted to personalize something for them. I have found many fabulous ideas but decided that I wanted to go with a combination of glass etching and vinyl on a picture frame. Over the hill I went to where they have frames for sale and found a really nice frame that would work perfectly for what I wanted to do. I got it home only to find out that instead of glass it was a sheet of plastic. I was not deterred by this, thinking this powerful stuff that could etch glass would surely etch plastic. I cut the stencils with the Cameo and applied then to the sheet of plastic and waited the appropriate amount of time and then rinsed the etching cream off. It didn't work. Who knew? Certainly not me. But on the positive side, neither did it leave the plastic one iota the worse for wear. So on to Plan B which really wasn't Plan B at all, but rather the result of "Now what". Over the hill is 50 miles away and I did not have time to make another trip, so I decided to go ahead and use the mat that came with the frame (Plan A called for it's disposal and thankfully I hadn't chucked it). The mat has four openings for 4 x 6 photos and I started at the top with the bride and groom's family name, thinking an engagement snapshot or wedding photo would look good at the top. For the second opening I used the groom's name for a single photo of just him. Same for the bride with the third opening. For the fourth and final slot I put the date of the wedding thinking a shot of them leaving on their honeymoon or another wedding photo would be nice here. Along the bottom of the mat I put "and they lived happily ever after". All lettering was cut from vinyl using my Silhouette Cameo. I really enjoyed making this for them. I hope they like it.
Thank you so much for stopping by today. Hugs, Shawna  Please note, this is an old post from the former Paper Kisses and Inky Wishes Blog.


Sunday, June 29, 2014

Silhouette Sunday Revisited

Hi there! Welcome to another Silhouette Sunday.   This post is from the former Paper Kisses and Inky Wishes blog.  The Silhouette Store gives away a free file each week and a few weeks ago it was a nice cut file for making 3-D roses. The Silhouette Plus Forum (a site for Cameo and SD digital cutter owners to chat and problem-solve) holds a weekly challenge encouraging the members to make something with the free file. I made my roses but wasn't sure what I was going to do with them until today.
I cut several of the patterns and then worked the paper over good with the McGill flower tool set (they are double-ended tools with a metal ball on each end and come in several sizes) to soften the paper which makes the petals easier to shape. I also used a little spritz of water. Once the paper was good and soft I crumpled them all up in my hand and then ran an orange ink pad over the paper. The crumpled paper caught the ink at all the high points and gave the roses some nice depth. Once the ink had dried, starting in the center, I rolled the rose around a pair of long-nosed tweezers (you can also use a pencil) to give the rose a loose curled shape, making it easier to do the gluing. Gluing is the next step and all you do is put glue on a small section, begin rolling, add more glue, roll some more and continue in this manner until you have the paper rolled up and resembling a rose. Notice that the center of each flower is much tighter and then "blooms" as you shape the flower. Let dry and then bend and shape the petals to your liking. It's amazing how the same pattern used by different crafters makes each rose different and one of a kind. Please keep in mind that you can cut the rose pattern with scissors, too, you don't have to have a digital cutter. These are fun and rewarding to make and I like to work on these while watching TV in the evenings. Here's the roses before I made the actual card.....
I knew I wanted to have them clustered on one side and that I wanted to use the cut out shown in black, and it all finally came together in this card..................

It's hard to read in this photo, but it says "Happy Birthday Dear Friend" and I used a sketch pen in my Cameo with the Black Rose font. It's also hard to see on the finished card, but I ran the black frame that is around the sentiment through my Wizard using the Swiss Dots embossing folder.
Thanks so much for stopping by today. Have a wonderful week. Hugs, Shawna

Wednesday, June 25, 2014

Scoot!

Hello!  Is everyone enjoying their summer?  It's still really, really, really dry here in northern California, but oh how nice to have warm summer days!  It will all go by too fast I'm sure.

Today I wanted to share a scrapbook page I did for the DCWV  June Scrapaholic Challenge.  I rarely do any one-photo pages  as my scrapbooks are more a chronological photo story of my grandkids' lives rather than art projects, but I only have this one photo of Fletcher on his scooter, so it worked out perfectly for the sketch we were required to follow.  And, you will notice this is a rather 'plain' page........I rarely go overboard with the embellishments and such on my scrapbook pages, as I have always felt that the photo should be the highlight of the page(s,) not all the pretties attached.  Just a personal preference. 

Supplies Used:

  • DCWV Fresh Floral Stack for the page base
  • DCWV Denim Stack for the large mat
  • Woven jute from Really Reasonable Ribbon
  • Antique button from my Aunt Grace's button box
  • Baker's twine
  • Silhouette cut file by Lori Whitlock 8.5 x 11 Background Shape, re-sized and cut in half
  • Font "MV Boli"
  • Leaf accent from my stash --- unknown vendor
  • Viva Pearl Pen
  • Gelly Roll pen for the small amount of journaling
Thanks for stopping by More Paper Kisses and Inky Wishes!  Hugs, Shawna

Sunday, June 22, 2014

Summer Fun Revisited

WELCOME SUMMER!!!!!  It's offical!!  In the on-going effort of salvaging what I can from the old blog, here is a card I created last year to celebrate summer and all that comes with this season. 


This card was made entirely with cut files from the Silhouette Store.  I love my Cameo die cutting machine as much now as I did when I bought it.  It can cut such tiny pieces; absolutely amazing.  When I made this card I had visions of using the same files, but sizing them a bit larger and using them on a scrapbook page.  Now, if Emma will just cooperate and give me the opportunity to photograph her having some summer fun we will be in business!

Thank you for stopping by More Paper Kisses and Inky Wishes.  Go have some summer fun!!  Hugs, Shawna

Sunday, June 8, 2014

Sneaking Around

Before I get started on today's post, I would like to say that I discovered that what I thought was the email portion of  the choices given for following More Paper Kisses and Inky Wishes was something else, so if you wanted to following along by email notification I have fixed that error.  Please try again.

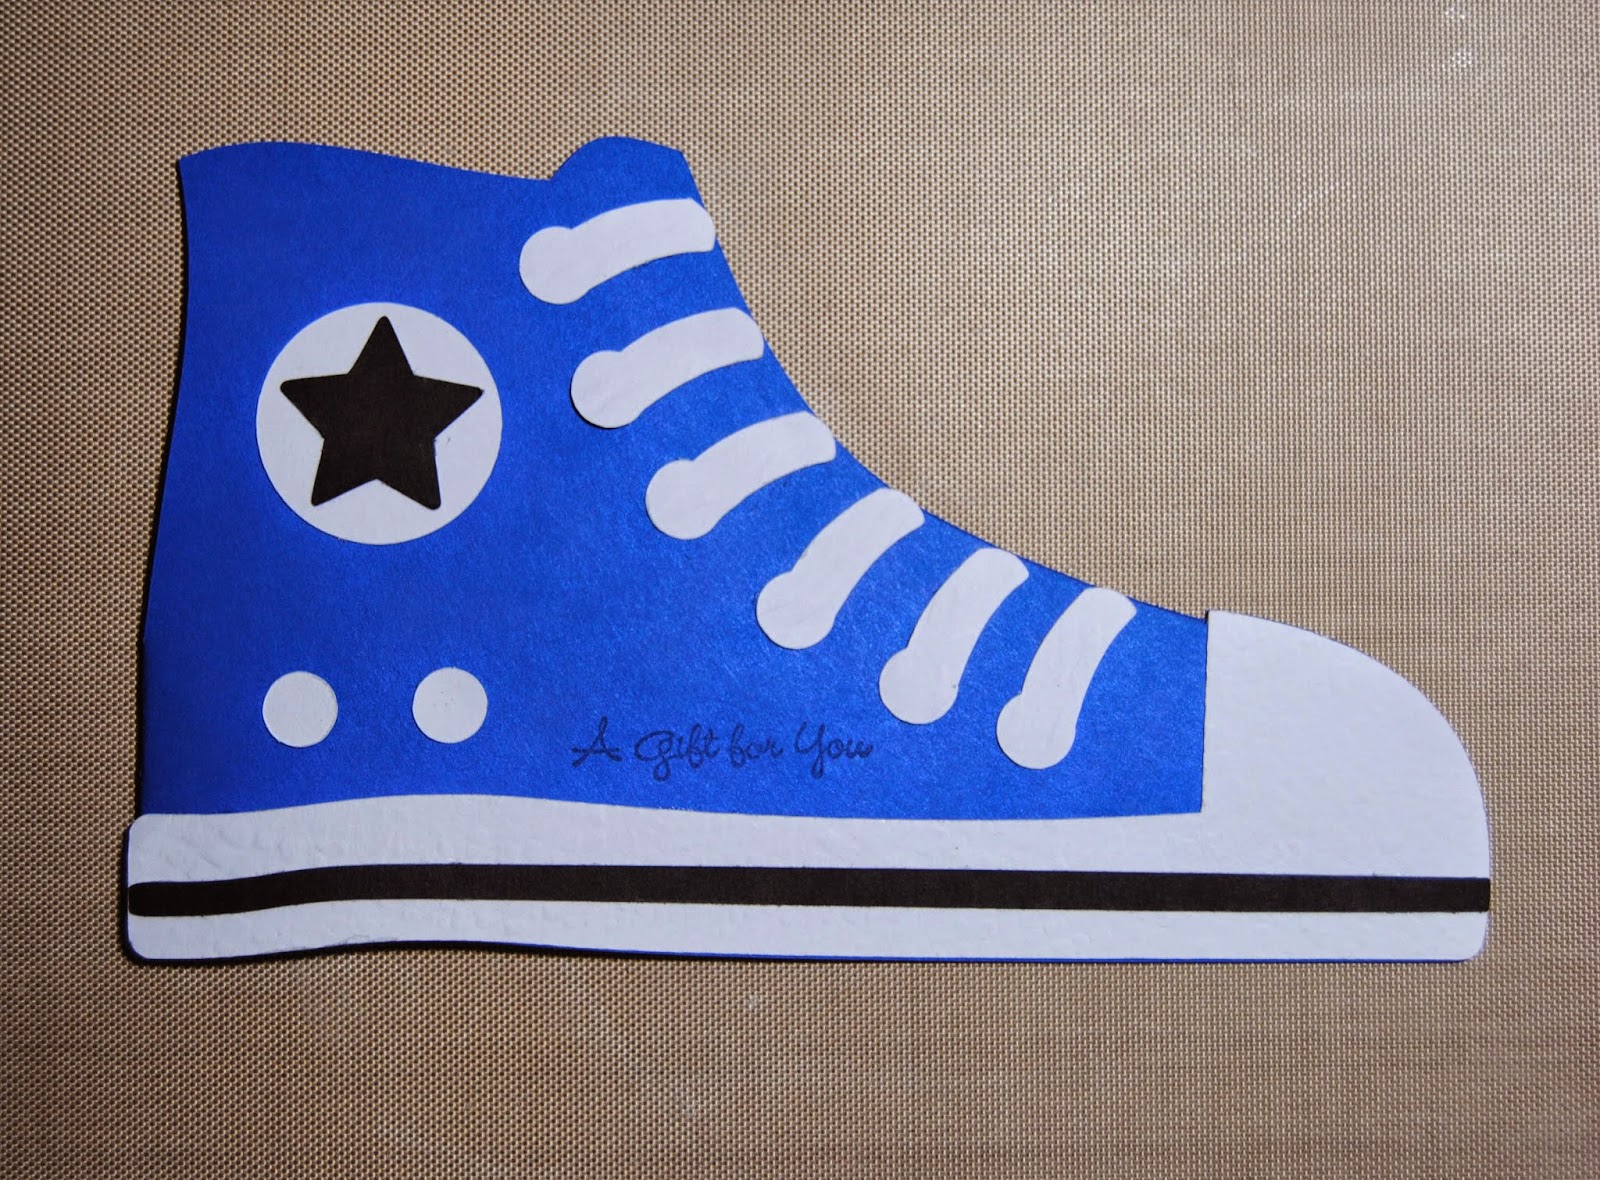
Trying to come up with a card idea for my oldest grandson's 15th birthday was made so much easier by browsing the Silhouette Store.  As many of you know, masculine cards are a challenge for me, but I can always count on Silhouette to help me out :). I wanted something fun yet quick to put together, and I found just the right cut file in the Silhouette Store called, who would have guessed, SNEAKER.  :)   In just a few easy steps and with just a couple of little extras, this card was ready to send.
  1. Choose the paper.     
  2. I duplicated the file in my Silhouette Designer Edition software, flipped one of the duplicates horizontally, then welded them together at the heel to make the card base (an easy technique to turn almost any cut file into a card).
  3. I cut one extra single shoe outline file, in white,  to add to the inside.  I cut the toe and sole piece as well as the laces and large and small circles out of white also.  The star and decorative line on the sole were cut from black. 
  4. I ran the toe/sole and the shoe lace pieces through my Grand Caliber with a Fiskars texture plate to give a bit of texture.   It's amazing what this does for the aesthetics of a paper creation.  Too bad it doesn't show up better in the photo!
  5. The individual pieces were then adhered to the card base.
  6. I stamped my chosen sentiment for the outside, used a CTMHs 'Happy Birthday' stamp for the inside sentiment, signed it, added cash, and it was ready to give. 

P.S.  He was thrilled with the card.  Said it looked just like his real tennies (referring to the circle and star feature).  That was just a piece of blind luck! 

Thank you for stopping by!  Hugs, Shawna

Wednesday, June 4, 2014

Grinning........

This Grinning Pug has the biggest smile on his face because he is the star of this birthday card that will, hopefully, get a good laugh.  He is the Squigglefly digital version of the Doggie Dentures mutt in that well known television commercial.  The image is colored with Copic markers.

I used a sheet from the DCWV Cotton Bloom stack for the card base.  This is not a new stack but I love it.  The colors are wonderful!  For the designer paper strip I used a sheet from the 6 x6 paper pad, also from DCWV, called Fashion District Quartier De La Mode.  I used the square Nestabilites dies from Spellbinders to emboss around the image then I tore along the outside embossed line for a distressed look.  The sentiment, both outside and inside, are from a clear stamp set from CTMH.  I used Liquid Glass, also from CTMH, on the eyes and toothy grin of this doggy dude to give a little extra something to his cute face.  I have had that Liquid Glass for years and it's still as good as the day I bought it.  Love this stuff!!! 

Once I had all the elements cut, colored, or applied all that was left to do was put it all together.  Quick and easy!  I may just have to enter this into the OutLawz CAS challenge. 


 The inside sentiment......
 This was taken with the Ott light on my work table turned on.  Gives this poor puppy a demon look, but it shows off the Glass Effects nicely!  Looks like a dog in the headlights, doesn't it?